Multiboards for Damp Walls
18th June 2026
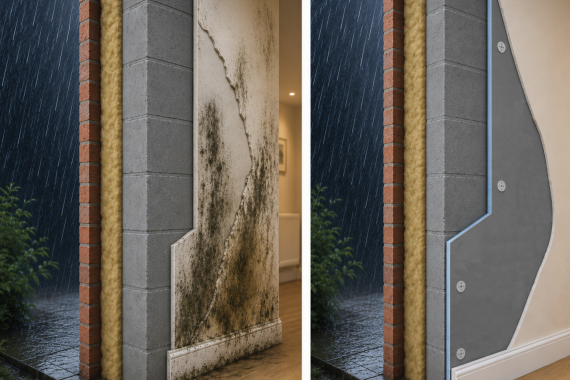
Marmox Multiboards – Making Mould a Thing of the Past
Mould is rarely just a surface problem
Wiping it away may improve the appearance temporarily, but it does nothing to address why it formed in the first place. To reduce the risk of it returning, the conditions that allowed it to develop need to be changed.
That is where Marmox Multiboards come in, forming part of a wider approach to controlling surface temperature, moisture, and airflow within internal wall systems.
Why mould develops in the first place
Mould grows when three conditions come together:
- Moisture in the air (humidity)
- A cold surface (often external walls)
- Limited airflow
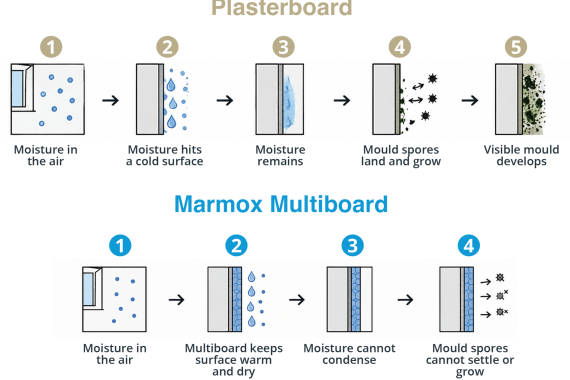
In many homes, especially bathrooms, utility rooms, and downstairs toilets, these conditions are difficult to avoid. External walls tend to be cold, and everyday activities like showering, cooking, and drying clothes increase humidity levels.
When warm, moist air meets a cold wall surface, condensation forms. Over time, this creates an environment where mould can establish and spread.
Why common advice often falls short
Typical guidance for dealing with mould usually includes:
Using a dehumidifier
While effective in controlled spaces, this can be impractical in rooms like bathrooms or toilets where moisture is continuously produced. Running a unit constantly also adds ongoing energy costs.
Opening windows for ventilation
This is often suggested as a simple fix, but it is not always suitable, particularly in colder months.
- Warm indoor air is lost, increasing heating demand
- Cold external air can raise relative humidity indoors
- Wall surfaces remain cold, maintaining the risk of condensation
As a result, the underlying issue often remains unchanged.
A different approach: controlling surface temperature and condensation risk
Instead of trying to remove moisture after it forms, a more stable solution is to reduce the conditions that allow condensation to occur.
Marmox Multiboards help achieve this by adding insulation directly to internal wall surfaces. This creates a more stable internal surface temperature, reducing the likelihood of warm moist air cooling rapidly when it meets the wall.
By keeping internal wall surfaces warmer, the point at which condensation forms (the dew point) is moved further into the structure, away from the room-facing surface.
This reduces the cycle where:
warm air → cold wall → condensation → mould growth
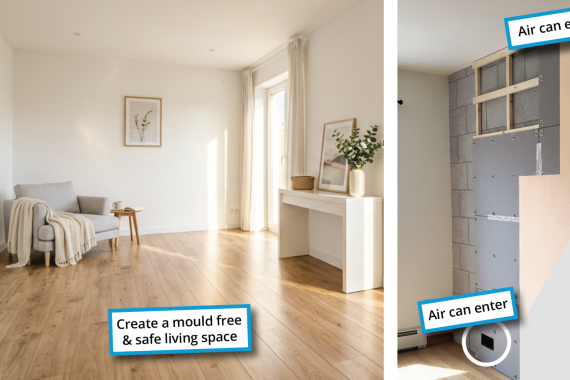
The role of a ventilated cavity system
A key part of this approach is the use of a ventilated air gap behind the boards.
A ventilated cavity helps in two main ways:
- It maintains a more consistent temperature on the original wall, helping shift the dew point into a safer zone within the construction
- It allows any moisture that enters the void to disperse through natural airflow, rather than becoming trapped
Without this buffer zone, insulation fixed directly against a cold, damp wall can restrict drying potential. This can lead to trapped moisture, where the wall structure is no longer able to dry naturally.
First step: removing existing mould
Before installing any new lining system, existing mould should be properly removed.
The method depends on the surface type and severity:
- White vinegar (undiluted): effective on painted walls and plaster
- Hydrogen peroxide (3%): suitable for tiles and non-porous surfaces (test first)
- Baking soda paste: gentle option for textured areas
- Bleach solution: only for non-porous surfaces; does not penetrate deeply
- Commercial mould remover: designed for broader use when instructions are followed
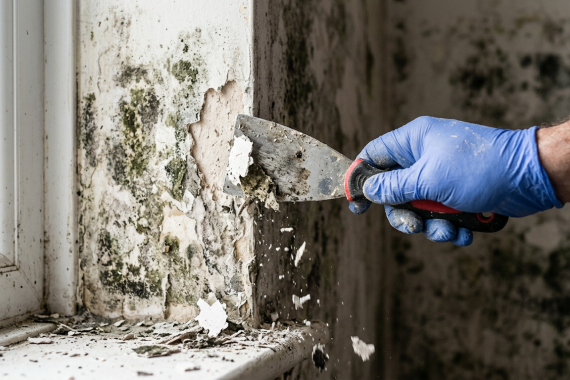
Basic cleaning process
- Test – Apply solution to an inconspicuous area
- Apply – Cover affected areas thoroughly
- Wait – Leave for 10–60 minutes depending on solution
- Scrub – Use a stiff brush if required
- Rinse – Wipe clean with a damp cloth
- Dry – Ensure the surface is fully dry before continuing
Be should that all mould has been removed in order to prevent it from returning.
Mould needs moisture to survive, so thorough drying is essential before installation work begins.

Installing Marmox Multiboards
Once the wall is clean and dry, installation can begin.
Marmox Multiboards are available in a range of thicknesses, with improved thermal performance generally increasing with thickness.
Step 1: Fixing battens
Install 25mm x 50mm treated timber battens vertically at 600mm centres across the wall. Secure using plugs and screws suitable for the substrate.
Step 2: Creating the batten framework
Fix a horizontal batten at the base of the wall, attached to the vertical battens. Continue installing horizontal battens up the wall.
From the base batten, measure 300mm up for the second batten, then continue at 300mm centres for the remaining rows.
Step 3: Fixing the boards
Position the first board onto the batten framework and mechanically fix using wood screws and Marmox washers. Each board should be secured with 12 washers.
Step 4: Bonding the joints
Apply Marmox MSP 360 adhesive along board edges to form a continuous bond between boards.
Step 5: Continue installation
Repeat the fixing process across the wall, ensuring consistent mechanical fixing and adhesive application between all board joints.
Step 6: Joint reinforcement
Apply Marmox Scrim Tape over all board joints to help reduce the risk of cracking if minor movement occurs within the structure.
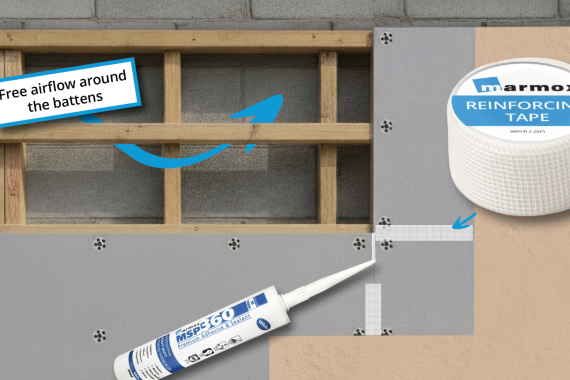
Step 7: Ventilation openings
Create ventilation openings in opposing corners of the installation:
- One low-level vent in a discreet corner
- One high-level vent on the opposite side
This allows airflow through the cavity behind the boards and the batten structure. Avoid areas that will be blocked by fixed furniture.
Step 8: Finishing the surface
Once installed and secured, the surface is ready for tiling or plastering.
There is no requirement for PVA priming. In warmer conditions, lightly dampening the surface may help control rapid drying when plastering.
Step 9: Final ventilation installation
After finishing decoration (painting or tiling), the ventilation grilles can be fitted into the prepared openings to complete the system.
Summary
Mould problems are rarely solved by surface cleaning alone. They tend to return when temperature, moisture, and airflow conditions remain unchanged.
A combined approach—removing existing mould, improving internal surface temperatures, and allowing controlled ventilation within a cavity—offers a more stable long-term outcome.
Marmox UK systems such as Marmox Multiboards are designed to form part of that approach by addressing the conditions that allow condensation and mould to develop in the first place.